Wednesday 28 January 2015

Chocolate Cherry Chip Blondie Bars

It's never too early to think about Valentine's Day...in fact, it is one of my very favourite times of year...I know, I know....haters gonna hate....but I am a die-hard romantic.  So when I received a bag of cherry M&M candies over the holidays, I immediately ferreted them away for some lovey-dovey baking.  Oh, the possibilities!  I decided to combine these little fellas with my long overdue intention to make blondies (ahem, I am after all, Blondie Bakes, but I have never actually made any blondies...). For you non-bakers, a blondie is kinda like a brownie, but without chocolate or cocoa.

If you can't find Cherry M&M's - you could always substitute with milk chocolate, peanut, or the peanut butter variety - just pick out the red ones (which means you can snack on all the other colours!). I have heard rumours of cinnamon M&M's - definitely worth a try.

The red coating on the M&M's melts away into pretty pinkish-red smudges, and the cherry flavour is just right - not too intense.  Make a batch of these, wrap up with a pretty bow and give them to your co-workers or neighbours on Valentines Day.  Share the love!


This version has quite a bit less sugar than some other similar recipes you will find out there, and with the additional 1.5 cups of chocolate, you won't notice a thing.  My chief taste-tester (read: husband) noted that the chocolate chips were almost unnecessary, and that the cherry taste was just enough to keep it interesting but not overwhelming.


 Chocolate Cherry Chip Blondie Bars

1 cup cherry M&M's
1/2 cup semi-sweet chocolate chips
3/4 cup unsalted butter, softened
1/2 cup brown sugar
1/4 cup white sugar
2 eggs
2 cups flour
1 tsp baking soda
1/2 tsp salt
1 tsp vanilla

Combine flour, baking soda, and salt in a medium sized bowl.  In a large bowl, cream butter with sugars until light and fluffy.  Using a hand-mixer, beat in eggs and vanilla.   Fold in flour and mix to combine.  Batter will be quite thick.  Using a wooden or other sturdy large spoon, stir in cherry M&M's and chocolate chips.

Press batter into a greased 8x8 inch square pan. Grease a spatula to help press the batter down, as it will be quite sticky.  Press a handful or so of M&M's across the top (if you didn't eat the rest of the bag already : ).  Bake for 25-30 minutes at 350 degrees or until cake tester inserted in centre comes out clean.

Best enjoyed within 2-3 days.


Sunday 18 January 2015

Classic Banana Bread

January is challenging.  It's time to give up that daily chocolate and puff pastry habit you picked up over the holiday season, yet it is peak season for comfort food.  A typical day starts with frigid dark mornings, 8 hours spent hunched over a desk under florescent light, with a daily high of minus 17 degrees (don't even mention the words 'wind chill factor' - it's just rude).  As if that isn't enough, cue the white knuckle drive home through snow and ice packed roads in the dark.  Ugh.  The thought of going outside again is unbearable.


Some people escape by booking a one-week stay at a resort somewhere south of 34 degrees north - but the inescapable reality (for most of us) is that it isn't a one-way ticket (or not even a return ticket dated post March 31).  So we endure.  I bake. A lot.

This weekend banana bread just felt right.  No whole wheat flour, pumpkin puree, coconut milk or chocolate chips this time. Just pure and simple. The classic.   


Classic Banana Bread

1 1/2 cups all purpose flour*
1 tsp baking powder
1 tsp baking soda
1/2 tsp salt
3/4 cup granulated sugar
1 egg
3 bananas, mashed
1/3 cup melted butter
1 tsp vanilla
1/2 cup chocolate chips (optional)

*substitute 1 cup whole wheat flour and 1/2 cup all purpose, if you like


Melt butter in a small saucepan over low heat.
Mash bananas in a medium sized bowl.  Beat egg into bananas.  Stir in sugar. 

In a separate medium sized bowl, combine the flour, baking powder, baking soda, and salt. 

Once butter is melted, stir into banana mixture. Stir in vanilla.  Stir in flour mixture.

Pour into a well greased loaf pan and bake for 45-55 minutes at 350 degrees or until cake tester inserted in the thickest part comes out clean.  Serve warm with butter spread on top. 


Tuesday 13 January 2015

Lemon Almond Tilapia with Coconut Rice

A recipe without sugar? Your eyes are not deceiving you.  I do occasionally try to cook, and this recipe is so good it must be shared.  Bonus - it's gluten and dairy free, too!


Lemon Almond Tilapia with Coconut Rice
recipe slightly adapted from Seriously Delish
serves 2-4

4 tilapia fillets
2 egg whites
1 cup ground almonds
1 tbsp lemon zest
1/2 tsp salt
1/4 tsp ground pepper
1 1/3 cups coconut milk (an average can will be enough)
1 1/3 cups jasmine rice
1 1/3 cups water

Preheat oven to 425 degrees.

Lightly beat the egg whites in a bowl.  Combine the almonds, salt, pepper, and lemon zest in another bowl.

Dip each tilapia fillet in the egg white and then into the almond mixture, pressing gently so the almond mixture adheres to the fish.

Place on a baking sheet and spoon any remaining almond mixture over top.  Bake for 15 minutes,   gently flip each fillet and bake for an additional 10-15 minutes.  (My fillets were so delicate that when I tried to flip them, the first one fell apart - so if flipping is risky - you can just bake for 30 mins without flipping).

As soon as you put the fish in the oven, start the rice.

Combine the rice, water, coconut milk and a pinch of salt in a saucepan and bring to a boil.  Reduce the heat to low and cover, cooking until the liquid is absorbed, about 30-40 minutes.  At this point you can add in 2 tbsp of toasted unsweetened flaked coconut, if you so desire.

Serve the tilapia and coconut rice with fresh herbs (I used parsley) and lemon slices.

Thursday 8 January 2015

Chocolate Peanut Butter Pretzel Tower Cake

I just may have overdone it a little bit...possibly.

I can't help myself.  I love creating special birthday cakes.  Besides, when a loved one's birthday is during or just after the holiday season, some extra extra special effort is required.  I am fortunate that my birthday is in May, which is a wonderful time of year to celebrate, but my dad's is on December 31, and my sweetheart's is on January 6.  Move over, Christmas.  Thanks, it was lovely, but your 15 minutes are up.  Hello cake season!!  

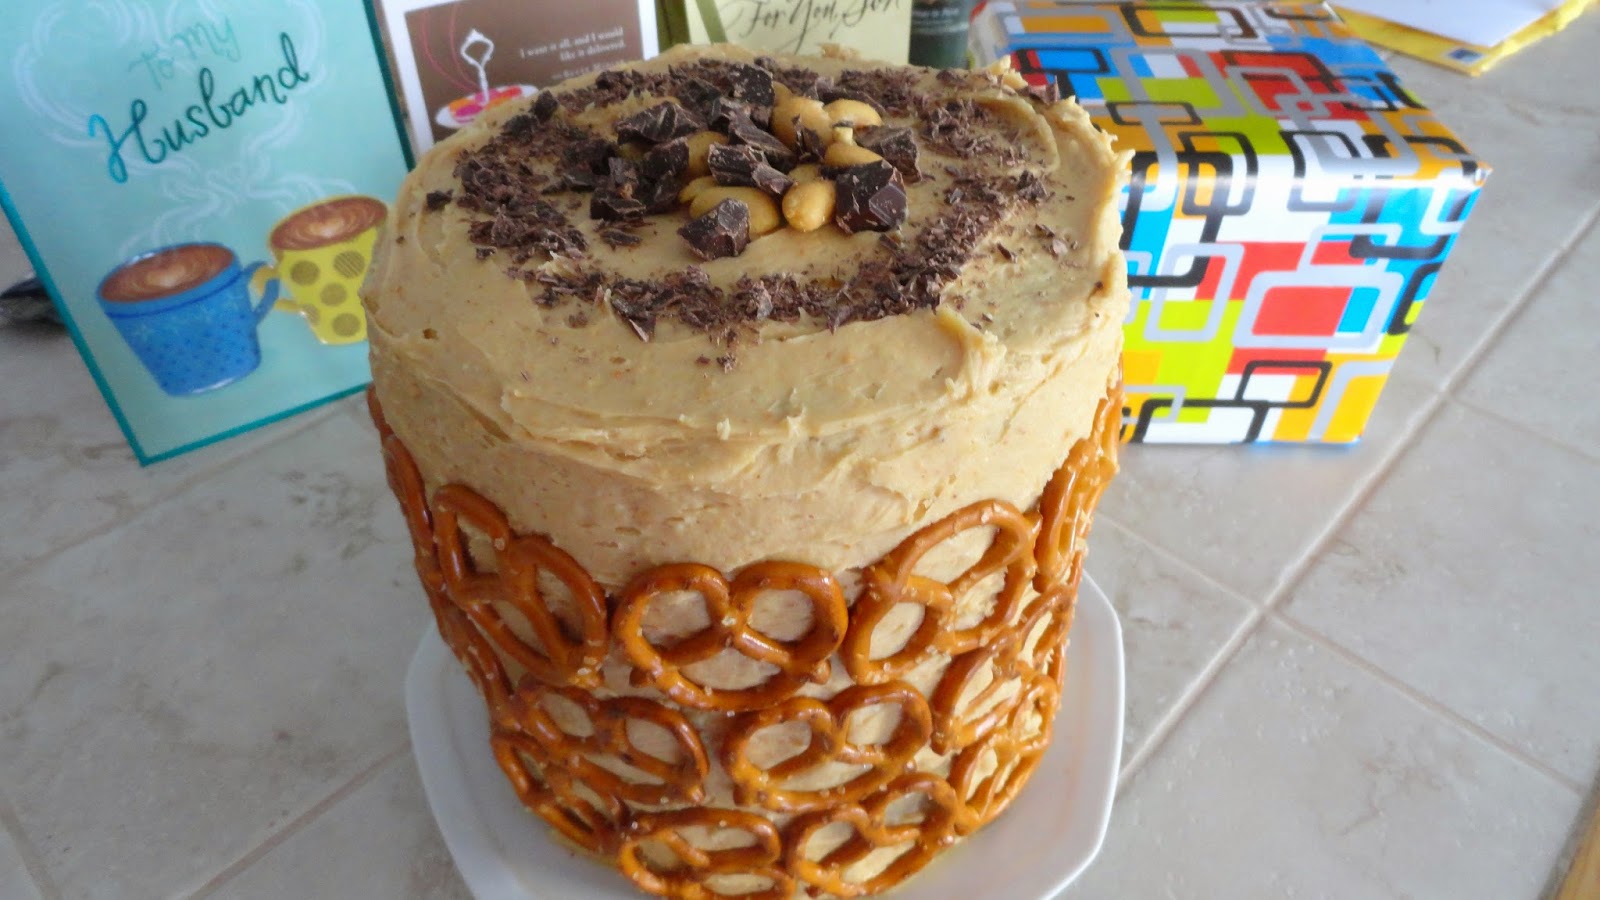
A substantial chocolate layer cake with rich peanut butter icing and crushed pretzel and chopped chocolate between the layers - this is absolutely decadent.


This cake was inspired by Joy the Baker's latest cookbook Homemade Decadence.  I used Joy's recipe as the base, and then modified it by changing up the ingredients slightly and choosing 3 6 inch cake pans instead of 9 inch ones.


I called this a tower cake because it is so tall it is downright silly and impractical.   But it is so much fun to light a candle, bring into a room and see the look of delight on the birthday face!

Chocolate Peanut Butter Pretzel Tower Cake
slightly adapted from Joy the Baker

Chocolate Cake
3 cups cake and pastry flour
3/4 cup cocoa
2 tsp baking powder
1 1/3 tsp baking soda
1 tsp salt
1 cup unsalted butter, softened
1 cup brown sugar
1 cup white sugar
4 eggs
1 tbsp vanilla
2 cups buttermilk

Peanut Butter Icing
1 cup unsalted butter, softened
3/4 cup natural creamy peanut butter
1/4 tsp salt
1 tbsp vanilla
3-4 cups icing sugar
4 tbsp half and half cream

Garnish
crushed pretzels, about 1 cup
1 tbsp roasted, salted peanuts
2 oz dark chocolate, chopped
Pretzel twists


To make the cake:

Combine flour, baking powder, baking soda, salt. and cocoa in a large bowl.  In a separate bowl, cream the butter with the sugars until light and fluffy.  Using a hand mixer, add in eggs, one at a time, beating in between.  Add vanilla.
Add half of flour mixture and half of the buttermilk, mixing well. Add in remainder of flour and the rest of the buttermilk, Mix until just combined, and finish with a spatula or wooden spoon.

Grease 3 deep 6 inch round cake pans.  Divide between pans until each pan is about 2/3 full (there will be some batter left-over, perfect for 3-4 cupcakes).  Bake at 350 degrees for approximately 30 minutes, or until cake tester inserted in middle comes out clean.  The middles will take a bit longer to bake, as each cake layer is quite thick.

Let cool in pan on wire rack for about 10 minutes, then turn out to cool completely.

To make the icing:
Combine butter, peanut butter, vanilla and salt in a large bowl with a hand mixer or stand mixer.  Add in 1 cup of icing sugar and 2 tbsp of cream, continuing to mix.  Add in second cup of sugar and 1 tbsp of cream, and final cup of sugar and final tbsp of cream.  Add in more cream or sugar as needed to obtain the right consistency.

To assemble and decorate the cake:
Place bottom layer of cake (once fully cooled) on a cake plate or stand.  Frost generously.
Sprinkle crushed pretzels and chopped chocolate as desired.  Place middle cake layer on top, and frost generously.  Repeat with pretzels and chocolate.  Place top cake layer on top, and frost generously.
Start to frost the sides of the cake, careful not to mix crumbs into frosting.
Start lining the sides of the cake with whole pretzel twists at the bottom and work your way around, pressing gently into icing to stick.  You may need to adjust the pretzels a teeny bit, or turn the last one in the row on its side to fit.  Repeat two more rows, or the whole cake, if desired,
Sprinkle top with peanuts and chopped chocolate.  Ta-da!